Affiliate Disclosure: We independently choose products & do research by our editorial team. The website contains affiliate links and we may earn a little commission at no extra cost to you if you purchase products through one of our links.
_____________________________________________________________________
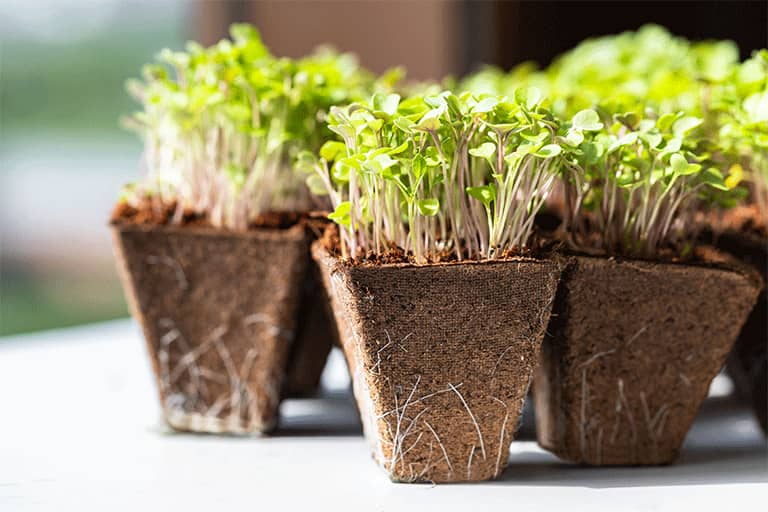
Love growing your own plants from seeds but hate repotting them? Then why not start using biodegradable peat moss planters and pots? Not only they will save you from the headache of repotting root-bound plants, but they will also help you play a part in reducing plastic pollution.
If you are worried about the price, then don’t. Believe it or not, you can make your own biodegradable planting peat pots at home from sphagnum Peat Moss at a low price.
And here you’ll learn to do the same thing. Just a few moments of your time reading the article and you’ll never need to use plastic seed starters ever again!
What is sphagnum Peat Moss or Peat Moss?
Before you begin working with peat moss, you should get a clear idea about the material itself to avoid making any mistakes during the procedure. So let’s begin-
Peat Moss, or sphagnum Peat Moss as some say, is actually just the dried, soil amendment version of decayed sphagnum moss and other organic materials. The peat moss we use in gardening at present is actually millions of years old decomposed sphagnum moss fibers harvested from the peat bogs.
Sphagnum moss is a common plant in peatland, and swamps situated in cold, northern hemisphere regions like Russia and Canada. As these dried fibers can hold about 30 times as much water as their dry weight, they can increase the soil’s water-retaining capacity. Therefore, they became popular among gardeners in the 1940s.
Why Choose Biodegradable Peat Moss Planters or Pots
Aside from being used in increasing the soil’s water-holding capacity, another popular usage of peat moss is producing biodegradable peat pots for seedlings. At present, biodegradable seed starter pots have become extremely popular amongst gardeners as an eco-friendly alternative to plastic seed trays.
But aside from this reason, gardeners also prefer using them to propagate plants that love being pot bound. Thus they needn’t change pots when planting the plants in larger pots. It also saves their time and helps the plants’ health.
Furthermore, using peat moss in producing Biodegradable Peat Moss Planters and Pots can offer a gardener a pot capable of helping the soil keep moisture and nutrients. This becomes extremely helpful while planting seedlings that prefer sandy soil. Also, as the pot itself is made of peat moss, the gardeners can opt for adding a lesser amount of peat moss while preparing the potting mixture and save the cost.
And lastly, peat moss is an alkaloid in nature. Therefore, using peat moss pots can give the seedlings of the plants preferring alkaloid soil an extra boost in their growth and health.
Peat Moss Planters Vs Pots
Above, we have learned quite a lot about biodegradable peat pots for starting seeds. But what exactly are peat pots?
In simpler terms, peat pots are made by compressing a mixture of peat moss, perlite, and shredded wood fiber pulp. You won’t find these materials being used in making regular pots. Check out the comparison table below if you want to learn more-
Peat Moss Planters | Regular Pots |
| Made of biodegradable materials like peat moss, wood fiber, and perlite | Made of long-lasting materials like clay, metal, plastic, etc. |
| Last for up to a year | Last for years |
| Does not prevent root growth | Prevents root growth by containing them |
| No need for transplants prevents root damage | Required transplants can cause root damage |
| Plants can be planted directly into the ground | Plants need to be removed before planting into the ground |
| Best for starting seeds | Best for planting trees |
How to Make Biodegradable Peat Moss Planters or Pots for seedlings
Now that we know a bit about peat moss pot, let’s start with our main attraction, shall we? But before you start learning how to make biodegradable peat moss planters and pots for your garden, you should secure some necessary equipment first.
Required Equipment for Making Peat Moss Planters or Pots
- Peat moss
- Perlite
- Wood fiber pulp
- Juice container
- Knife
- Two wooden dowels of 0.50-diameter and 4-inch length
- Drill machine
- 125 and 0.50-inch drill bits
- Measuring equipment
- Screw
- Screwdriver
- Gloves
- Water
- A bucket
Making biodegradable Peat Moss Planters or Peat Pots: A Step-by-Step Guide
Did you gather everything listed? Then let’s begin. Although the procedure might seem a bit complicated at first, once you begin, you’ll see how effortless the entire procedure is.
- First, mix a 1:1:1 ratio of peat moss, perlite, and wood fiber pulp together to make a mixture of 1lbs amount.
- Then add a bit of water and let it sit for the peat to absorb.
- In the meanwhile, take an empty juice container and cut it at the desired height from the bottom to make an open-end box
- Place the tube in an upside-down position to face it’s closed-end upwards, and create a 0.50-inch hole in the center using the drill.
- Now take one of the wooden dowels and make a hole of 125-inch diameter, and 0.50-inch depth on its top center.
- Now center the tube’s lid on top of the dowel and use a screwdriver to insert a screw through the lid to securely attach it to the dowel.
- Afterward, put the container facing its open end upwards.
- Then check the mixture and use your hands to slowly mix and knead it.
- If necessary, keep adding water in small amounts until it gains a soft clay-like consistency.
- Now insert about half a cup of the mixture into the open end of the tube.
- Create air compression by inserting the lid into the top of the tube pressing the dowel on the lid. The dowel will help in magnifying the pressure and thus compact the mixture.
- After the container’s shape is formed, remember to create a drainage hole inserting the other dowel through the pre-drilled hole.
- Place the container near sunlight and allow the mixture to dry.
- Lastly, gently turn the tube upside down to collect the peat pot.
- Done!
Note:
You can also make large peat pots using this method. For that though, you’ll have to make sure that the mold used to have an appropriately sized lid to apply pressure. Also, you should put enough mixture into the mold so that the peat pot’s wall gains at least an inch thickness.
Readymade Biodegradable Peat Pots for Seedlings
How to use peat pots
Now that you have your hand-made peat pot, let’s begin using them. Don’t worry; using peat pots is not much different or complicated than regular ones. On the contrary, they are much easier to use for seed starting than typical ones.
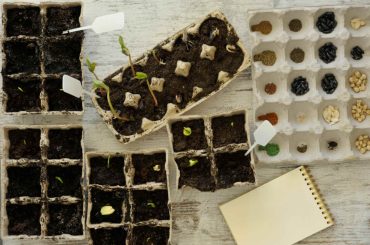
Starting seeds in Planters or peat pots
- First, place the pots on a tray.
- Then, fill up the pots to the one cm of their tops using the potting mixture.
- Then place the seeds over the soil and water them using a sprayer.
- The soil level will go down a bit after watering. Refill the vacated place using soil and this time, fill it until the brim.
- Re-water them until the pots sit in an inch or so of water.
- Let them stay like that for about an hour until they soak all the water and get a dark, hued color.
- Now place them in a sunny, well-ventilated area and water them regularly until the seeds sprout and plants emerge.
Transplanting the plants into the ground
Now that your plants have emerged and matured, it’s time to plant them. To do so,
- Place the peat pots onto a tray
- Then fill the tray using water
- Let the pots soak water until they get dark in color
- In the meanwhile, use a shovel to make a hole in the garden
- After you are done, place the pot inside the hole and cover it up until its edges disappear below the ground. This is very important because if any part of the pot is exposed to the air, it will cause the peat to dry out.
- Gently water them to help them settle.
- Done!
What size peat pot or Planters to use
Peat pots come in various sizes. To make the most of this expensive product, you should have a clear idea of what sized pots to use.
Here is a simple tip for you. Think; are you going to plant a bunch of herbs together, or just some vegetable that needs good soil distance for root growth?
If your answer is the first one, then there is no need for you to waste your money buying dozens of small pots. It would be best to use a large pot to plant all the seeds together so that you can plant all of them together into the garden when the time comes.
You will also need large pots of going to start growing seeds of larger trees to give them more room for growth. But, if you are planning on propagating smaller-sized plants, using smaller peat posts might be more beneficial and cost-effective.
How to get rid of mold on peat Planters
Many complain that their peat planters suffer from growth. But in reality, the problem occurs because they don’t know how to remove mold from peat Planters.
To do so, you’ll simply have to place the pot in a warm, dry, and well-ventilated area. Then you’ll have to spray a 20:1 water-H2O2 mixture over the pots. Keep doing so for a few days and your mold will go away in no time.
How long do peat pots take to decompose?
You might feel curious about the decomposing rate of your peat pots after planting them. Actually, the procedure depends on several factors like root growth, soil condition, etc. but in general, the post will decompose from months up to a year after planting. If they take longer times, then they should of lower quality.
Frequently Asked Questions (FAQs) On Biodegradable Peat Moss Planters
1. Do peat pots need drainage?
Yes, they do. Peat pots are excellent in preserving soil water. But the same property can cause the plant’s death from overwatering. Therefore, it is best to insert a draining hole at the bottom before planting the seeds.
2. Do roots grow through peat pots or Planters?
Yes, they do. It is because peat pots are porous and suitable for air and water circulation. The same quality allows the plant’s roots to penetrate its walls.
3. How long do biodegradable peat moss pots or Planters last?
If the pots are kept in a secure place, they will last for about eighteen to twenty-four months without fail. But if you plant seeds in them and plant them into the ground, they will decompose within a year max.
4. How do water peat pots or Planters?
Watering peat pots is nothing complicated. You can simply use a watering can or spray to water your plants. You can also place the planters on a tray and fill the tray with water. The pots will absorb water themselves.
5. Can you plant peat pots or Planters in the ground?
Yes, you can. Peat pots are biodegradable. Thus you can plant them directly in the ground and they will decompose by themselves.
6. How long can seedlings stay in peat pots?
As long as the roots don’t start growing through the pot’s wall, it should be okay to keep the seedlings in the peat pots. But once they begin this phase and the pots start breaking down, you should plant them in the ground. Generally, this procedure takes an average of one to four weeks.
Final Thoughts
So, what do you think? Do you think you can make your own biodegradable peat moss planters and pots now? Listen, worrying will get you nowhere. So let go of your worries and start making preparations. As long as you follow the steps right, we are sure that you won’t fail to supply your seeds with some healthy biodegradable post every year.

